|
|

|
|



|
|
|
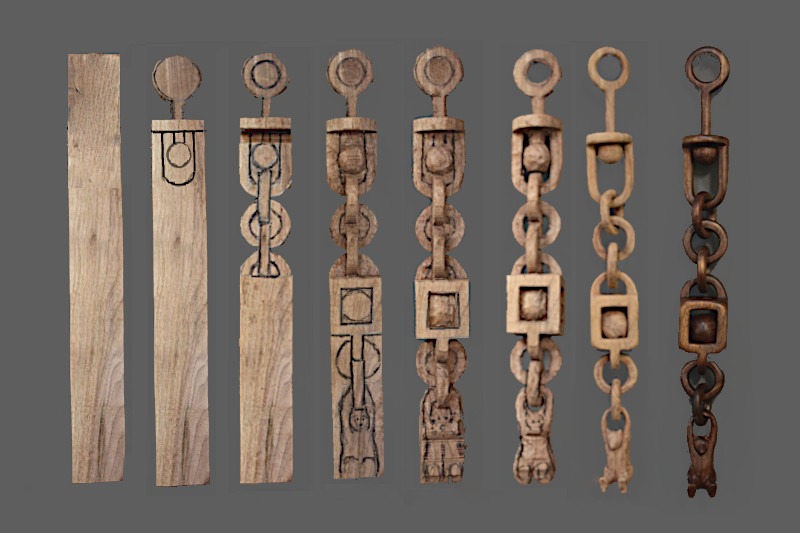
A carved wooden chain is a showcase of traditional woodcarving techniques all in one piece with roots in folk art from Appalachia and rural regions all over the world. I was fascinated by the notion of creating interconnected chain links from a single unbroken piece of wood and wanted to test my skill as a woodcarver by creating one myself. So like many woodcarvers, a carved wooden chain was one of the first projects I attempted. Forty years later and with dozens of chains to my credit, I'm still fascinated with carved wooden chains and always seem to have one in progress. It's common for carved wooden chains to be placed in the category of a whimsy. A whimsy in art has been defined as the combination of humor with lighthearted magic, fantasy, or fairy-tale qualities. I'm okay with that description. Vintage and antique carved chains are often attributed to people who were in occupations such as railway watchmen, sailors at sea, prisoners, or hobos, in other words people with a lot of time on their hands. On eBay some of the descriptions I've read include: a true piece of maritime folk art, traditionally crafted by sailors and whalers during long voyages, whimsy chain created purely for amusement, beautifully intricate, yet without a practical purpose, a whimsical treasure from a bygone era, hand carved wooden whimsy chain, tramp style folk art. However accurate such claims may be, I like to think that there were many people in the bygone era, whatever their circumstances might have been who found the time to create one of these chains because they were fascinated by them and wanted to test their skill as a woodcarver. Most of the old chains that I have seen in private collections or museums that have a known history, were carved by people with typical occupations who carved them in their spare time or after retirement. There's no doubt that carving a wooden chain can take a lot of time, but I do each one slowly and methodically over a period of months. I start most days at the bench working on the latest rendition over a cup of coffee to warm up the hands and quietly ease into the day's activities. Besides the challenge of creating such a piece and the satisfaction of continuing a folk art tradition, carving a wooden chain is a way to keep in tune with traditional woodcarving tools and techniques, skills that come into play with many other projects, from whimsical to profound. |

|
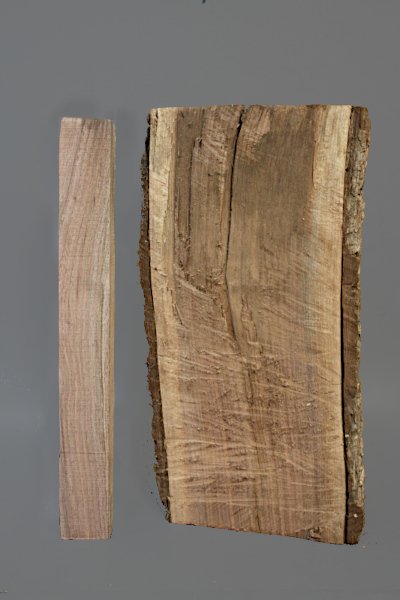
Having recently completed a project during which I took sequence pictures, starting with a walnut log and concluding with the finished carvings that emerged from it, I decided to do the same with this project. A carved wooden chain is an ideal subject for sequence pictures that illustrate the steps involved because the transformation of the piece of wood is so dramatic. The fact that I chose Black Walnut for the piece isn't surprising since it's my favorite carving wood, and I choose it for most carvings, but walnut wasn't a traditional choice for chains and isn't commonly used for such carving today. Carved chains were traditionally carved from softer woods such as basswood or pine because they were carved by hand with just a knife. Even today with the advantage of power tools, chains are rarely carved from a hardwood such as walnut. To the right is the cut out blank, measuring 2 by 2 by 18 inches, and beside it, the walnut half log it was cut from. The starting log was 10 inches in diameter and originally cut to three feet in length. After the tree was cut down this log sat out of the weather for over three years before I cut out the blank so it was well dried and very hard as a result. The blank was cut from the right side of the half log about two inches from the edge. |
|
|
|
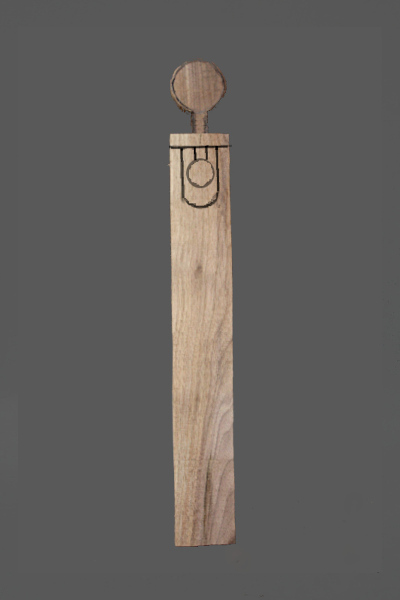
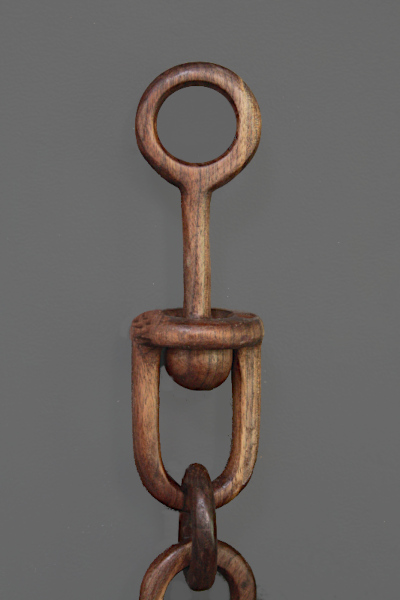
In recent years, I've begun my chains with the same features: a loop for hanging that's attached by a rod to a swivel joint, then two or three basic chain loops, leading to the classic ball-in-a-cage component. Following that I usually wing it and try to do something a little different each time. I sketch a rough outline of the chain on the blank with a sharpie. I don't like a lot of lines confusing the issue and possibly leading to a miscut. I draw what needs to be cut first, and choose not to sketch the chain out too far ahead. Another reason for this is that I'm usually not sure how I'm going to proceed with the piece and often change my mind while it's in progress. For this chain I first outlined and cut out the hanging loop and the rod which would lead into a swivel joint, a common chain component. I like a swivel joint at the start because then regardless of how it's hung, the rest of the chain can be turned so that whatever side that's most interesting can face forward. The hanging loop was cut out with a band saw, keeping the cuts as neat and tight as possible. I first drew the lines I needed and cut out from one direction and then turned the piece ninety degrees and repeated the same operation. |
|
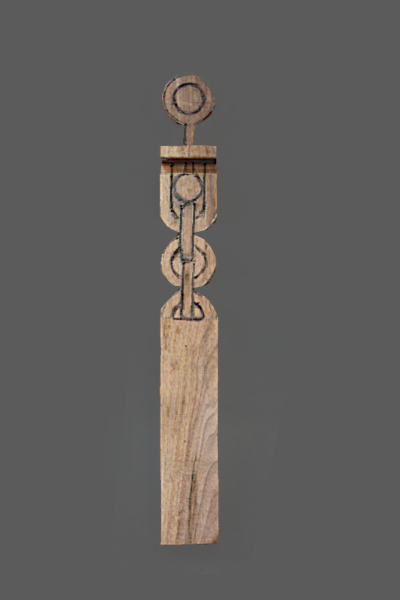
I checked over and over to make sure the lines were in the right place and that I was cutting the right line. For the first section of this chain it was a fairly straightforward process, but it will get more complicated further along. Next I drew in the frame for the ball at the end of the rod extending down from the hanging loop and sketched the ball in the center of the frame. The ball serves as the bottom half of the swivel joint once the rod is cut free, and will allow the chain to swivel in either direction while preventing the rod from slipping up through the the top plate of the frame. Then I added three circular loops, the center one, facing forward and interconnecting the other two which are drawn in side view. The first loop connects to the bottom of the swivel joint frame, and the third loop connects to the half loop at the top of what will be the ball-in-a-cage. The image to the right shows the piece after cutting with a band saw. I turned the piece ninety degrees and drew in the components from this point of view, the first and third loops in full profile and the center loop from a side view. This stage is illustrated in the bottom photo. I then repeated the previous step, cutting out the shape with a band saw. |
|
|
|
With these larger sections of wood out of the way I transitioned to hand tools to get down to the nitty-gritty. With the blank clamped firmly to the bench, I employed a parting tool, skewed chisel and a small gouge for the next operation, driving the tools with a fourteen ounce mallet. I tapped very carefully with the mallet, taking small measured bites because dry, brittle wood is liable to split with too much force. Starting from the frontal perspective, I left the two center links which are drawn in side profile untouched for now and I focused on removing wood from both sides of them down to the links that will connect them. The wood was also removed around the ball of the swivel joint down to its side view outline, which is seen in the next two images below. Also, while I was in the area, tools in hand, I rounded off the corners of the top plate of the swivel joint frame. This operation was then repeated from all sides, redrawing lines when necessary and turning the piece often to make certain I was cutting along the right lines. As I do with all carvings, I roughed out the various features to just outside the lines I drew so as to leave enough wood for adjustments in the final stages. |
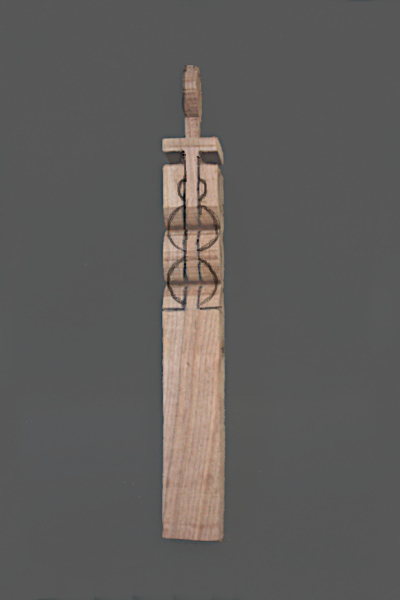
|
To the right and below are images of the chain at this stage with the components of the chain roughed out close to their final shape but with the centers still solid and all parts still connected. I redrew the guidelines on this section for the next step and also sketched in my plan for the rest of the chain, which included a ball-in-a-cage and a bear hanging from the last link. There's no reason why I couldn't have taken the upper part further along, even to completion, separating the components, but I prefer to work chains like I do all sculptures, and that is to move in from all directions at the same pace. That way I have a picture of the whole piece in front of me so that I can coordinate the overall look as I work in the final details. The ball-in-a-cage, where a section of the blank is carved to form a hollow outer cage with a free-moving sphere trapped inside, is a classic woodcarving design, often added to chains. It is one of the most common features of chains both old and new. No doubt the reason is because it's such a clever illusion and often prompts the question, 'how did you get the ball in there'. And my reply is, 'the ball was already in there. I just cut everything else out and left it behind. |
|
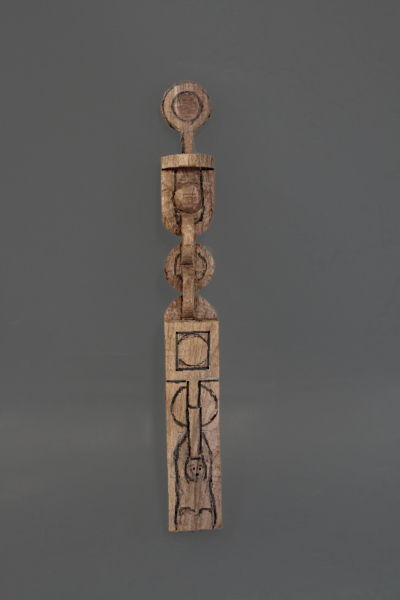
|
|
To begin the ball-in-a-cage I drew the outline of the cage on all sides and then removed the wood within the outline using a v-shaped parting tool, a small fishtail gouge, and a mallet. This resulted in a square depression about a quarter inch deep on all sides. Then I drew the ball in the center of each cutout, and removed more wood with the same tools, now cutting deeper around the ball while shaping it somewhat and keeping it centered in the cage. I prefer to have the top and the bottom open on the cage as well which adds a few more challenges to the process. For one thing it requires carving into end grain which is a difficult way to go at any rate, but to add to the fun, the half loops that link the ball-in-a-cage to the chain and the adjoining links are directly in the way. I opted to leave the cage ends alone for now and deal with them in the next step. A bear, hanging from the last link is something I've done before, and used it again here because I thought it would make for interesting sequence photos. I've never seen another carved chain with this feature, although I would be surprised if it hasn't been done somewhere at some time. |
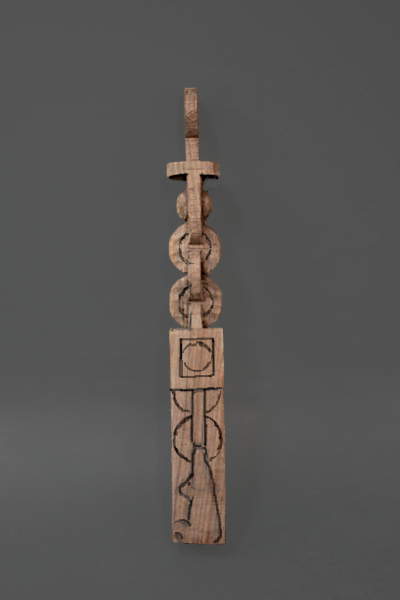
|
I had enough wood to add two more loops, which were cut out and then carved in the same way as the ones at the top of the chain, and I designed the bear such that its arms and clasped hands would serve as the final link. The bear was cut out with a band saw from the front view and then side, resulting in the rough boxed-out shape of a bear as seen in the image below. As a first step to remove wood from the inside areas of the chain, I drilled dozens of small holes with a 3/16 bit, to honeycomb and weaken the wood. I drilled in from all directions that were possible staying well within the guidelines and making sure that all was clear on the other side where the bit would poke through. When an area was weakened enough, I employed a small gouge and with a gentile twisting motion, crumbled out enough wood such that I could get a knife in to clear the rest. With the ball-in-a-cage, I used the drill again to honeycomb the wood between the ball and the cage, drilling at an angle from one opening to the adjoining openings on all sides and straight across at the top and the bottom of the ball to the opposite side. |
|
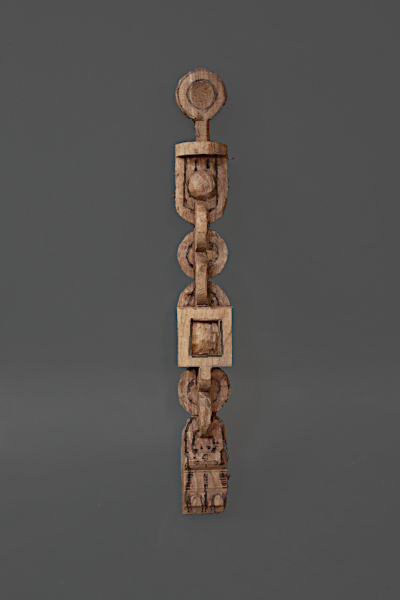
|
|
It's at this point I tackled the top and the bottom of the cage, honeycombing with holes from every possible angle and then removing the wood with gouge and knife. The usual difficulty of cutting into solid, end grain was offset by the fact that I was able to use the grain to my advantage and split off small pieces of wood between the holes. It still was not an easy operation, and this could be why most ball-in-a-cage components on carved chains are left closed at the top and bottom. The results of removing the wood from inside areas of the chain are depicted in the pictures below. The drill marks are evident in the close-up image of the cage and on the inside edges of the loops. I used a knife to cut away at the remaining wood that still connected the ball to the sides of the cage, and at the same time, shaped the ball as much as possible before it was completely cut loose. The ball becomes much more difficult to handle once it's loose. When there was enough space between ball and cage, I shaped the ball with 50 grit sandpaper wrapped tightly around a flat stick, holding the ball against the inside of the frame with the fingers of my left hand while using the sanding stick with my right. |
|
I first focused on sanding down the high spots until the ball was reasonably round. Then I would release my hold and let it turn randomly with the action of the sandpaper for a second and then clamp down again. I sanded for a few seconds where it stopped, let it turn again, and repeat, repeat repeat. During this process, I checked often to make certain the diameter of the ball was greater than the width of the openings of the cage. Because if in the end, the ball rolls out of the cage, it's time to weep and moan. The next step was to cut the connection between different components of the chain with a scroll saw after first removing the scroll saw blade, threading it through the roughed out openings in a link, and then attaching it back to the saw. By connection 'between' two components, I'm referring to the eight places where they butt up against each other, beginning with the first chain loop and the ball of the swivel joint, down to the last link between the top of the bear's hands and the bottom of the loop above it as pictured at the right. These eight connections can be cut with a scroll saw, saving much time and minimizing risk of breakage. I checked and double checked before making these cuts because once a cut is made, there's no taking it back. |
|
|
|
At this stage the piece of wood looks like a chain, as shown in the photograph to the left, but it's still connected at eight points that I call the inside connections. By 'inside' connections I mean a junction where the inside edges of a frame or loop are still attached. The first instance is where the shaft of the swivel joint passes through the top plate of the frame, the second is where the inside bottom of the swivel joint frame is attached to the inside top of the first loop, and the last is where the inside of the bears paws are connected to the bottom inside of the last loop. These places are not easy to get to and I made it harder on myself because I prefer the look of tight links which leaves not much of a gap between them to work with to clear out the wood. The tool I use for this operation is an Xacto knife with a #16 blade. Xacto knives were the tools I began carving with, and I used them to earn my first merit badge as a Boy Scout in 1967, which happened to be Woodcarving. Over the years many other tools relegated them to the sidelines, but I've always had Xacto knives and blades in my workshop that are called upon for specialty operations. Carving my initials into a finished piece is one instance and separating inside chain links on wooden chains is another. |
|
The Xacto #16 blade has a unique offset shape featuring a short, angled cutting edge that makes it ideal for cutting these tight areas. New blades are extremely sharp and cheap, so I treat myself to a fresh blade for this operation. It can be slow, tedious work at times, but I don't rush it. This is the final step that transforms the piece of wood into a chain and the chance of breaking it at this point is very real, so there's every reason not to get impatient. I limit myself to liberating one or two links during any given work session and enjoy this last critical step. I don't focus so much on removing wood, since there's not much to remove here. Instead I repeatedly slice the guideline I've drawn and move in slowly from all directions until the cuts meet in the center and it is cut through. I get a feeling of satisfaction (and relief) with each link that loosens and finally cuts loose. When all links are free the piece of wood has become a chain. With the chain making part completed, the effort turned to the final shaping, sanding and details. I like to get all components close to their final shape before they're cut loose, but also want them free while there is still a little extra wood to play with. That way each can be visualized and finished up as a separate little carving. |
|
|
|
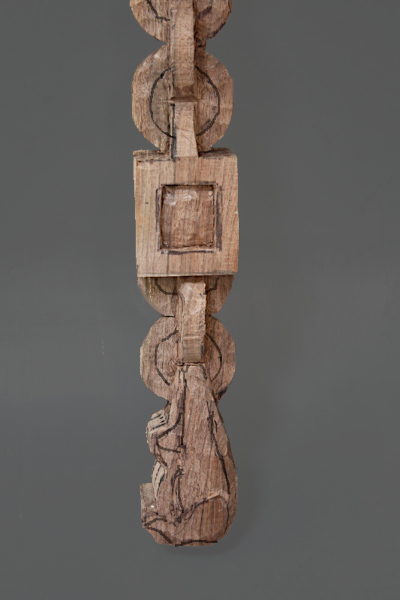
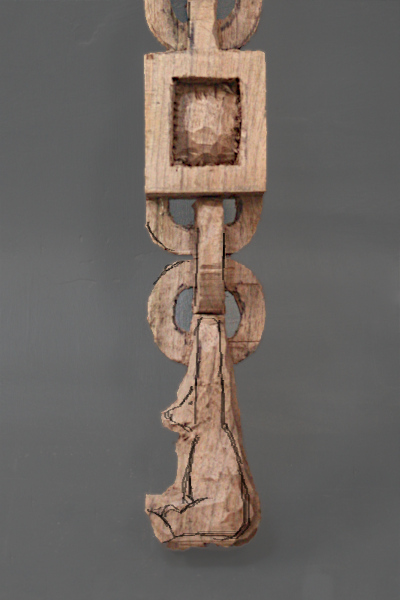
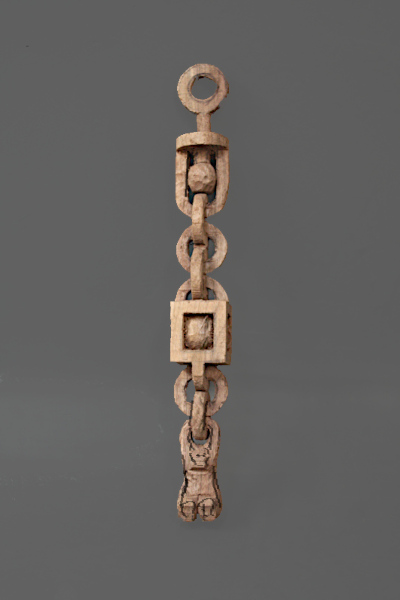
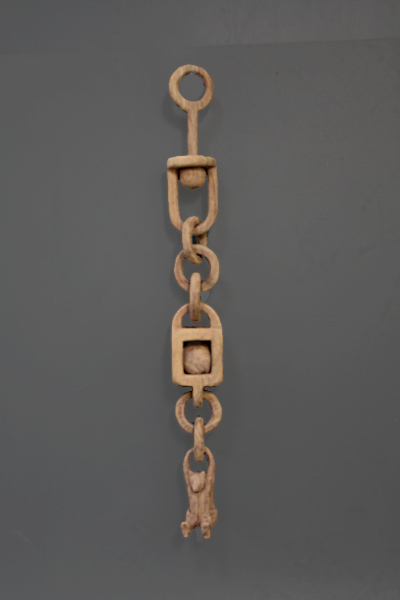
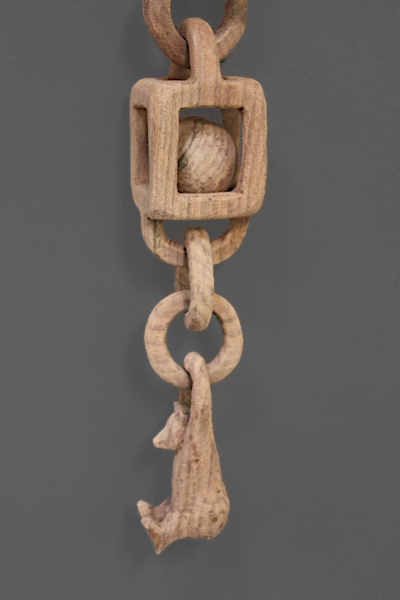
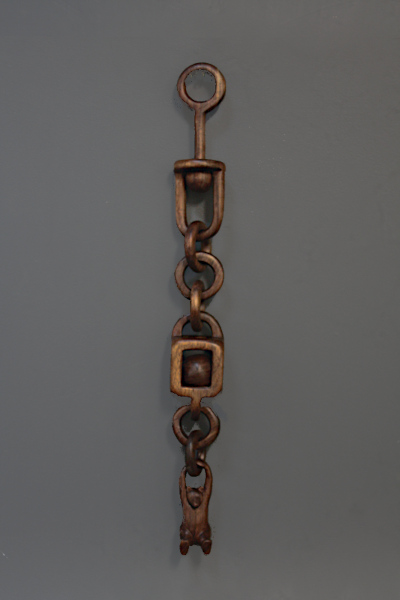
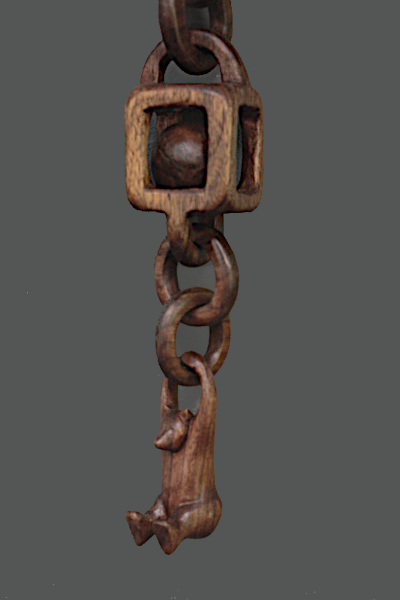
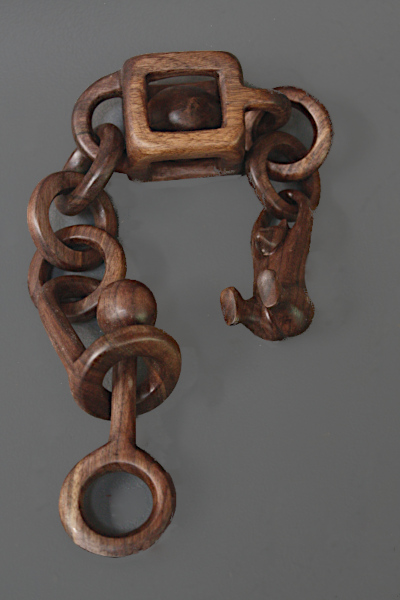
For the finishing stage, I worked my way down from the top, one component to the next, carving with a knife, followed by sanding. The first sanding was with a stiff-backed 50 grit paper that I bent or rolled into various shapes and often wrapped around sanding sticks, to fit the circumstances. Sandpaper this coarse serves as a sculpting tool as well as a finishing tool. A three inch wide by eight inches long piece, rolled into a stiff tube is ideal for shaping and sanding the inside of chain loops. The bear required a bit more carving and I took my time with it, striving to make it appear as natural as possible, considering what it is depicted as doing. I limited the detail and sanded the bear smooth to fit in with the look of the rest of the components. Pictured above is the chain after the first sanding stage, and a detailed image of the ball-in-a-cage and the bear is pictured to the left. Next the chain was worked over with successively finer grits of sandpaper, 80, 120, and 180, and then run through the finishing procedure I described elsewhere. The completed bear chain is pictured below. |
|
|
|
|
These photographs of the completed chain were taken on May 30th, 2026, and the photograph of the chain blank right after it was cut from the log was taken four months earlier on February 2nd. The finished chain is 19.5 inches long, while the blank it was carved from measured eighteen inches. So the piece of wood gained an inch and a half in length when the links were freed, the excess wood was cleared away, and the chain was measured at its full length. |
|
|
|
|
The bear chain is now hanging in the showroom with other chains I've completed. I look it over from time to time along with the others, comparing them and thinking of ways to improve my techniques or of something different to try on the next one. Other times I just look at them for what they are and forget about the many hours I put in for each one, until it almost seems like somebody else made them. That's when I become fascinated all over again by the notion of creating interconnected chain links from a single unbroken piece of wood. I get the urge to start another one, to get whimsical again and test my skill as a woodcarver one more time. |
|
|

|
|